Pages

Showing posts with label homemade. Show all posts

Monday, August 22, 2011

Homemade Bailey's Irish Cream


Found this easy, quick and fantastic recipe from The Cupcake Project blog. I've made it several times and it's been fantastic every time. I've made changes to it each time and each time it's been delightful. Not sure that I have a favorite. I'll list my options for you.


INGREDIENTS
1 cup heavy cream
14 oz sweetened condensed milk (tried low-fat / regular)
1 2/3 cup irish whiskey (I used Jameson's)
1 tsp instant coffee (instant espresso for more coffee flavor)
2 Tbs chocolate syrup (I used Hershey's)
1 tsp vanilla (I used vanilla paste)
1 tsp almond extract (Lorann almond emulsion for more almond flavor)


  1. Combine all ingredients in a blender & set on high speed for 30 seconds.
  2. Bottle in a tightly sealed container & refrigerate. Shake before using.
  3. Will keep for 2 months.

Tuesday, July 26, 2011

Homemade Oreos


I found a great little recipe on The Cupcake Project blog for making homemade Oreos and couldn't resist!  I mean...who doesn't love Oreos? I've made these twice now and my husband and kids will not let me give these out or share outside of our house! I'm not one for super sweet frosting/filling and so these were great.

There are other recipes that require rolling into a log and chilling. Honestly, I don't have the patience for that. When I get excited about making something, I want it now! So this recipe satisfied my quirk and my family's sweet tooth.


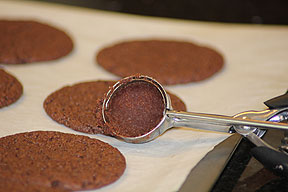
My first question when making these is….Hershey's or Nestle? Nestle was sitting in the front of my cabinet so that's what I chose. The batter came together easily in my stand mixer and absolutely no effort at all. The effort lay in the pressing out of the cookies and cutting them into perfect circles with the cookie cutters. This is where my 2nd SET of questions came….how big of a scoop? How big of a circle/cutter? Will the cookies flatten as they bake? Will they spread? So my first batch was created with a standard cookie dough scoop and pressed until just over the size of the 2" cutter.

6 minutes into the cooking…YES they are spreading…oops…so that's how she got approximately 40 cookies…I was over half way through the dough at 16 halves!  So the 2" cookie cutter circles turned out to be 3" baked.

Time to choose a smaller cutter and less cookie dough.  I will give the small end of a melon ball scoop and the 1.5" cookie cutter a shot. Woo hoo! That's the winning combination: small end of melon scoop and 1.5" cookie cutter. If you want thicker cookies...use the larger end.

On to the frosting/stuffing. I used butter flavored shortening the first time…because that's all I happened to have in my cupboards. It definitely made it yellowy and not white. If you must have white, stick with regular ol' shortening and clear vanilla extract. I also, however, chose to use my favorite staple, vanilla bean paste instead of extract which caused it to go darker as well, but I choose flavor over looks any day!

The Chocolate Wafers
Makes about 20 stuffed cookies or 40 halves
  • 1 1/4 C all-purpose flour
  • 1/2 C unsweetened cocoa (I used Hershey's Special Dark)
  • 1 t baking soda
  • 1/4 t baking powder
  • 1/4 t salt
  • 1 C sugar
  • 1/2 C plus 2 T butter, room temperature
  • 1 large egg
  1. In a medium-sized bowl, mix the flour, cocoa, baking soda and powder, salt, and sugar.
  2. Beat in the butter and the egg. Continue mixing until dough comes together in a mass.
  3. Take rounded teaspoons of batter and place on a parchment paper-lined baking sheet approximately 2 inches apart. With moistened hands, slightly flatten the dough. (I found that while the dough wasn't sticky enough to roll, I could press it flat with my hands like the recipe said and then use cookie cutters to cut perfect circles. If you just care about the taste, then there is no need for the cookie cutters. Also, remember this is a chance to get creative and use all kinds of cookie cutters.)
  4. Bake for 9 minutes at 375 F. Set on a rack to cool.
The Filling
  • 1/4 cup room-temperature, unsalted butter
  • 1/4 cup vegetable shortening (1st batch I used butter flavored for more depth of flavor)
  • 2 cups sifted powdered sugar
  • 2 teaspoons vanilla extract (I used vanilla bean paste instead.)
  1. Place butter and shortening in a mixing bowl, and at low speed, gradually beat in the sugar and vanilla.
  2. Turn the mixer on high and beat for 2-3 minutes until filling is light and fluffy.
  3. To make a cookie, pipe teaspoon-sized blobs of cream into the center of a cookie using a pastry bag with a 1/2 inch round tip. (If you don't have a pastry bag, you could easily just spread the filling with a knife or use a Ziploc with the corner cut off as a pastry bag. I had a pastry bag, but I only had a star tip. The tip doesn't matter much.)
  4. Place another cookie, equal in size to the first, on top of the cream. Lightly press, to work the filling evenly to the outsides of the cookie. Continue this process until all the cookies have been sandwiched with cream.